| [ Team LiB ] |
|
Using Spinbox WidgetsThe spinbox widget is based on the entry widget, and therefore all of the options and operations available for an entry are also available for a spinbox. Additional options and operations give access to the spinbox's enhanced functionality. In addition to the text entry field, a spin box has up and down arrow buttons, allowing the user to "spin" through a fixed set of values such as dates or times. A spinbox normally allows a user to type any arbitrary text into the text area, but you can also configure a spinbox so that users can only spin through the valid choices. There are two ways to set the range of values for a spinbox. The first is to set numerical minimum, maximum, and increment values with the from, to, and increment attributes, respectively. Each time the user clicks the up or down arrow, the spinbox adjusts the displayed value by the increment. For example, the spinbox in Example 34-4 has a range of -10 to 10, and uses the default increment of 1. Example 34-4 A simple spinbox with calculated values
spinbox .s1 -from -10 -to 10
pack .s1
Particularly if you start using floating-point values and increments, you might need to specify the format for displaying the value. You do so by setting a value for the format attribute in the form %<pad>.<pad>f, as used with the format command. (Note that no other format-like conversion specifiers are supported by the spinbox.) Example 34-5 demonstrates using the format attribute. Example 34-5 Formatting numeric values in a spinbox
spinbox .s2 -from -10 -to 10 -increment .25 -format %4.2f
pack .s2
Another option for specifying values for a spinbox is to enumerate them. Simply provide the spinbox's values attribute a list of values. If you set a spinbox's values attribute, it ignores its from, to, and increment attributes. Additionally, if you set the wrap attribute of a spinbox to True, then the spinbox wraps around from the last value to the first (or vice versa) while spinning through the values. With the default wrap setting of False, the spinbox stops spinning values once it reaches the beginning or end. You can use the wrap feature with either enumerated values (values) or value ranges (from and to). Example 34-6 demonstrates both using enumerated values and wrapping in a spinbox. Example 34-6 Enumerating spinbox values and wrapping
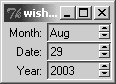
set states [list Arizona California Nevada "New Mexico"]
spinbox .s3 -values $states -wrap 1
pack .s3
In all of the spinbox examples shown so far, the user is free to type any arbitrary text into the entry portion, rather than selecting one of the spinbox values. In some applications this is acceptable, and you could use standard validation features to ensure reasonable values. (See "Validating Entry Contents" on page 508.) However, sometimes you want to allow a user to select only one of the preset spinbox values. The easiest way to accomplish this is to set the spinbox state attribute to readonly. Unlike the disabled state, which makes the widget insensitive to user actions and prevents programmatic changes to the widget's contents, the readonly state allows a user to spin through the values. You can also programmatically change the contents of the spinbox with the set operation, and even change the values while the spinbox is in the readonly state. Example 34-7 shows an example of using the readonly state for several spinboxes, allowing the user to select a date. The spinboxes are linked by textvariables to elements in a global array, so that after the user selects the date, you can easily retrieve the values from the array. Example 34-7 Using the spinbox readonly state
set months {Jan Feb Mar Apr May Jun Jul Aug Sep Oct Nov Dec}

spinbox .month -values $months -textvariable date(month) \
   -state readonly -width 8
spinbox .date -from 1 -to 31 -textvariable date(date) \
   -state readonly -width 8
spinbox .year -from 2003 -to 2010 -textvariable date(year) \
   -state readonly -width 8

label .l_month -text "Month:"
label .l_date -text "Date:"
label .l_year -text "Year:"

grid .l_month .month
grid .l_date .date
grid .l_year .year
grid .l_month .l_date .l_year -padx 2 -sticky e
grid .month .date .year -sticky ew
|
| [ Team LiB ] |
|