| [ Team LiB ] |
|
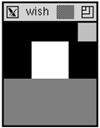
The Cavity ModelExample 25-5 Mixing bottom and right packing sides
# pack two frames on the bottom.
frame .one -width 100 -height 50 -bg grey50
frame .two -width 40 -height 40 -bg white
pack .one .two -side bottom
# pack another frame to the right
frame .three -width 20 -height 20 -bg grey75
pack .three -side right
When we pack a third frame into the main window with -side left or -side right, the new frame is positioned inside the cavity, which is above the two frames already packed toward the bottom side. The frame does not appear to the right of the existing frames as you might have expected. This is because the .two frame occupies the whole bottom side of the packing cavity, even though its display does not fill up that side. Can you tell where the packing cavity is after this example? It is to the left of the frame .three, which is the last frame packed toward the right, and it is above the frame .two, which is the last frame packed toward the bottom. This explains why there was no difference between the previous two examples when .one.gamma was packed to the left, but .one.right was packed to the right. At that point, packing to the left or right of the cavity had the same effect. However, it will affect what happens if another widget is packed into those two configurations. Try out the following commands after running Example 25-3 and Example 25-4 and compare the difference.[*]
button .one.omega -text omega
pack .one.omega -side right
Each packing parent has its own cavity, which is why introducing nested frames can help. If you use a horizontal or vertical arrangement inside any given frame, you can more easily simulate the packer's behavior in your head! |
| [ Team LiB ] |
|